Zebralight SC600w Mk II L2 입니다.
우선 제품 스펙입니다. (홈페이지 자료 가져옴)
- LED: Cree XM-L2 Neutral White (Nominal CCT 4400K)
- User Selectable Levels: 3 main levels (High, Medium and Low). Each main level can be programmed to one of its two sub-levels. The second sub-level of the each main levels can be further programmed to different brightness levels.
- Light Output (runtimes)
High: H1 1020 Lm (PID, approx 2 hr) or H2 620 Lm (PID, approx 2.5 hrs) / 330 Lm (3.9 hrs) / 150 Lm (11 hrs)
Medium: M1 65 Lm (30 hrs) or M2 30 Lm (66 hrs) / 11 Lm (172 hrs)
Low: L1 3.5 Lm (16 days) or L2 0.4 Lm (2.5 months) / 0.06 Lm (4.6 months) / 0.01 Lm (5.5 months)
Beacon Strobe Mode: 0.2Hz Beacon at Low / 0.2Hz Beacon at H1 / 4Hz Strobe at H1 / 19Hz Strobe at H1
(Light output are ANSI out the front (OTF) values. Runtimes tested (and parasitic drain estimated) using ZL631 batteries. Runtimes of the two PID controlled levels (1020Lm and 620Lm) vary greatly with ambient temperature and air circulation.)
- Operating Voltage Range: 2.7V - 4.2V
- Battery: One 18650 size (up to 69mm long) 3.6/3.7V li-ion rechargeable. Batteries are not included in the package.
- Parasitic Drain: Negligible (much less than the self discharging of a battery)
- Beam Type
80 degree spill
10 degree hot spot
- Dimensions
Head Diameter: 30 mm
Body Diameter: 25 mm
Length: 101.6 mm
- Weight
2.75 oz (78 gram) without battery
- Features
PID thermal regulated outputs (1020Lm and 620Lm)
Battery capacity indicator (LED flashes 1-4 times, 4 short clicks to start)
Automatic stepping down from High to Medium, and from Medium to Low when battery capacity is low
Builtin over-discharging protection (2.7V cutoff)
Durable electronic soft-touch switch
Smart user interface provides fast and easy access to all brightness levels and beacon-strobes.
Precision machined unibody casing from premium grade aluminum bar stocks
Proprietary heat sinking design bonds the LED board directly to the unibody aluminum casing
Durable natural hard anodized finish (Type III Class I)
Sealed and potted LED driver circuitry
Tempered optical grade glass
Orange peel textured reflector
Battery reverse polarity protection
Pocket clip
Lanyard ring
Waterproof to IPX7 (2 meters, 30 minutes)
아래는 작동법(UI) 입니다.
This light has 3 main levels (High, Medium, and Low) and a beacon-strobe mode. Each main level can be programmed to one of its two sub-levels. The second sub-level of each main levels can be further programmed to different brightness levels.
Basic Operation
One short-click turns on the light to High or turns off the light.
Two short-click turns on the light to Medium.
Three short-click turns on the light to the beacon-strobe mode.
Press and hold (for over 0.6 seconds) turns on the light to Low and then Medium and High. Release at the desired level.
Advanced Operation and Configuration
- Press and hold to cycle from Low, Medium and High, release at the desired level to set. When press and hold, the light always cycle from Low to High regardless which level you are currently in.
- Double click to toggle and select between the two sub-levels for that main level. Sub-level selections for the 3 main levels are memorized after the light is turned off and through battery changes.
- The second sub-level (H2, M2 and L2) of each main levels can be further programmed to different brightness levels. At a main level, double-click 6 times to start configuration. On subsequent double-clicks the light will cycle through different brightness levels. Short click to turn off the light when finishing configurations. The selections for the second sub-levels are memorized after the light is turned off and through battery changes.
- This light uses the main LED (flashing 1 to 4 times) to indicate the estimated remaining capacity of the battery. To start the battery indicator, (from Off) short-click 4 times without pause.
- Beacon-strobe mode can be accessed from 3 short-clicks when the light is Off. Once in the beacon-strobe mode, you can double-click to cycle through different types of beacons and strobes. Beacon-strobe settings are memorized when the light is turned off and through battery changes.
상자는 간단한 종이박스입니다.

단촐한 구성품

오링 2개와 클립, 그리고 본체에 부착된 랜야드링이 전부입니다.
판매가($95)를 생각해보면 정말 부족한 구성품이죠.

클립은 열처리가 된 것인지 모르겠지만, 빛에 비춰보면 여러가지 색이 드러납니다.


제브라라이트의 회색 아노다이징은 변함없습니다.

반대편, 본체에 링이 기본적으로 연결되어 있습니다.


라이트에 있는 각인은 몸체에 있는 로고와 모델명이 전부

반대편은 손으로 잡을 때 그립감이 좋도록 가공되어 있습니다.
클립은 헤드와 테일캡 쪽 두군데에 부착할 수 있습니다.

랜야드링 왼쪽에 보이는 홈이 클립 부착하는 곳이죠.
또한 널링을 보면 몸체와 테일캡이 서로 다릅니다. 테일캡쪽이 더 도드라지게 가공되어 있어서 마찰력을 높이는 형태입니다.
테일캡을 여닫을 때 미끄러지지 않도록 하려는 구조로 생각됩니다.

아래처럼 랜야드링을 부착하는 곳이 튀어나와 있어서 라이트가 구르는 것을 방지하는 역할도 합니다.

스위치
클릭감은 꽤 부드럽습니다.


AR코팅이 확실히되어 있습니다.

OP타입 반사경이고, LED는 Cree사의 XM-L2 Neutral White입니다.

테일캡만 분리됩니다.

오링 두께도 얇지 않아 좋고, 나사선도 잘 가공되어 있습니다.

테일캡 스프링
최근에 나온 SC600 Mk III의 경우 테일캡 접촉부가 Pogo Pin 형태로 변경되면서 이슈가 있는 것 같더군요.
(배터리를 넣고 라이트를 흔들면 딸그락거리는 소리가 발생된다거나, Pogo Pin 도입을하면서 라이트 길이를 줄여서 비보호배터리만 사용가능하다던가)

아래는 Zebralight SC5의 테일캡에 있는 Pogo Pin 구조입니다.
(출처:www.candlepowerforums.com)

배터리 +극이 맞닿는 부분도 스프링으로 되어 있기 때문에 배터리 +/-극 모두 스프링으로 배터리를 지지하는 형태라서 충격으로 배터리가 접촉부에서
떨어져 라이트가 꺼지는 일은 별로 없는 구조입니다.

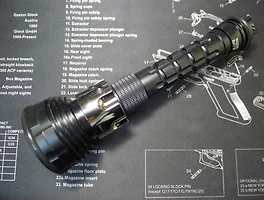
크기는 소형 18650 라이트답게 한손에 쥐기에 딱 적당합니다.
스위치도 헤드쪽에 있어서 조작하기도 쉽구요.

실내빔샷(거리 약 50cm, ISO 100, 태양광, 1/250s)
L1 (3.5lm)

M1 (65lm)

H2 (620lm)

H1 (1020lm)

실외빔샷 (거리 약 5m, ISO 100, 태양광, 1s)
M1 (65lm)

H2 (620lm)

H1 (1020lm)

H1(1020lm) 모드 원거리 빔샷

최근에 SC600 MK3가 나오면서 단종되어 버린 SC600w MK2 인데요. 제브라라이트라는 브랜드에서는 동일 라인업에서 신모델이 나오면 구형 제품은 단종시키기
때문에 구입하고 싶어도 구하기 어렵게 되는 점이 아쉬운 부분입니다.
'Flashlight > Review' 카테고리의 다른 글
| Jil Lite Constel Red Color Warm White Simple Review (2) | 2016.05.30 |
|---|---|
| Zebralight H52w, H52Fw Headlamp Review (4) | 2016.05.16 |
| Jil Lite Deacon XP-L CW Upgraded by Jil Lite (0) | 2016.05.02 |
| Nitecore TM16GT XP-L HI review (0) | 2016.04.25 |
| Zebralight S6330 2nd review (0) | 2016.04.18 |